This is a short video illustrating the use of Continuity Editing - also displaying the important of the 180degree rule.
Tuesday, 22 May 2012
Preliminary Task
This is a short video illustrating the use of Continuity Editing - also displaying the important of the 180degree rule.
Monday, 19 March 2012
Teacher Assessment: Feedback on evaluation
Here is my feeback in which my teacher reviewed my evalutation posts and gave me constructive feedback in how I could improve certain aspects and posts and what I have done well:


From viewing and reading through all this reasonable feeback I will definitely take each, individual point into consideration and work on improving what I have been told to. For the things I have been told I am doing well I will continue to do what I am doing so that my progress will continue and improve.
Thursday, 1 March 2012
Teacher Assessment: 'What have you learnt about technologies from the process of constructing this product?' post
Below is feedback from one of my teachers of whom has assessed my blog post on technologies that I used whilst completing my media product. The teacher gave me constructive feedback on what went well (WWW) and what could be improved (EBI):

From looking at this I can really pick out what I need to improve on and what I have done well when completing this post. I am very happy with the feedback I have received and I will take on board the fair improvements that I have been set.

From looking at this I can really pick out what I need to improve on and what I have done well when completing this post. I am very happy with the feedback I have received and I will take on board the fair improvements that I have been set.
Tuesday, 28 February 2012
Peer Assessment - 28/02/12


From looking at the feedback I can see that I need to add more videos of examples of how I have done and included certain things in my media product, in order to make it more clear for the audience to see and possibly understand. I take on everything my peer has said and will work on improving what I need to and take on the good points in order to carry it on in any future posts.
Monday, 20 February 2012
Teacher Assessment: Opening sequence
Here is the feedback sheet we recieved as our teachers evaluated and marked our opening sequence:


As you can see in the feedback sheet we have been given points of which were good and points of improvements. We have till 28th February in order to take on and complete these improvements. In order to do this in a effiecient way my group and I sat down together and organised what dates on which we will re-shoot specific clips and times where we can complete the other improvements.
Friday, 10 February 2012
3. What kind of media institution might distribute your media product and why?
In this video below I talk about how my group and I first chose 20th Century Fox to distribute our media product but then changed our minds due to taking into account certain aspects, which is all explained in the clip:
2. How does your media product represent particular social groups?
Here is a Slidrocket presentation on how I have represented certain social groups in my opening sequence:
Sunday, 29 January 2012
7. Looking back at your preliminary task, what do you feel you have learnt in the progression from it to the full product?
This is a Sliderocket presentation on how I think I have progressed from my preliminary task to producing my opening sequence. Examples have been included to go with the text to visually show you the points I have made.
Peer Assessment: Opening sequence
Below are assessments which were carried out by another group of whom watched our opening sequence and then filled in this sheet below:


 By looking at what the feedback sheets say you can clearly identify that we are being successful in what we are doing at this moment in time. The EBI's that we have been given are really helpful in letting us know exactly what we need to change and work on when continuing editing our opening sequence.


Thursday, 26 January 2012
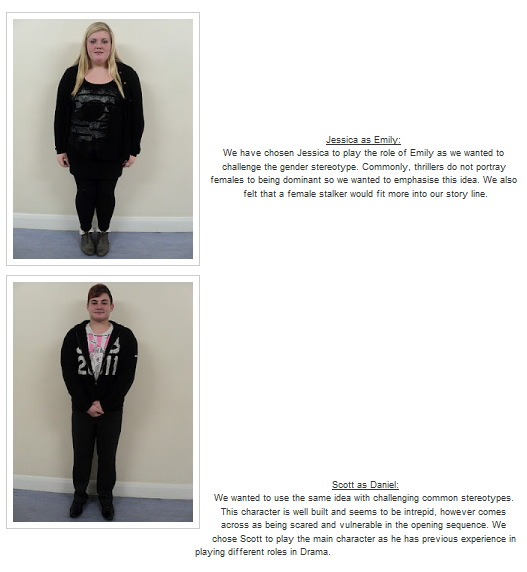
1. In what ways does your media product use, develop or challenge forms and coventions of real media products?
When looking at my media product I am very confident in the fact that it challenges and fits in with real opening sequences.
I think this because when planning what we would do in our opening sequence we straight away drew a mind map of our initial ideas and was set on challenging the stereotypical genders that are used within thrillers/ psychological thrillers. So instead of the main character being a dominant, strong male who attacks a weak woman, we swapped them around so that we had a woman being the dominant character who attacks a male. We really wanted to do this because we thought it would be a really interesting way of capturing the audiences attention right at the start as well as the clips that were also used to pull them in. We don't reveal to much of the character at all so the audience are constantly on edge and ask "What's actually happened?", "Who are these people?", "How do they know eachother?" and "Why did this happen?".
We kept to the conventions of a thriller by making the costumes dark, casual and also having a blood stained top. Instead of using a knife as the weapon I thought it would be better and in a way more interesting to use a cro bar as I haven't really seen this type of tool used as an actual weapon in other films. The group also brought in that instead of using a car to get away the murderer would be on foot, walking away from the scene. We really used the low key lighting and extreme close ups to hide the identities of the characters whilst still revealing the surroundings by the use of an extreme long shot, still hiding and not realing the character. The music used is an eerie ambient wind to build up a specific atmosphere of tension and uncertainty which is seen in the short clip above. You can also see this in 'Bricks' opening sequence, here is a video showing 'Bricks' opening sequence and then followed by our first shooting:
Also we challenged the equilibrium of the product as right at the start we are shown an extreme close up of blood pouring into the frame, which can be seen in other thrillers but not a lot, which automatically puts the audience on edge as they can't make out and confirm what this liquid is:
I think this because when planning what we would do in our opening sequence we straight away drew a mind map of our initial ideas and was set on challenging the stereotypical genders that are used within thrillers/ psychological thrillers. So instead of the main character being a dominant, strong male who attacks a weak woman, we swapped them around so that we had a woman being the dominant character who attacks a male. We really wanted to do this because we thought it would be a really interesting way of capturing the audiences attention right at the start as well as the clips that were also used to pull them in. We don't reveal to much of the character at all so the audience are constantly on edge and ask "What's actually happened?", "Who are these people?", "How do they know eachother?" and "Why did this happen?".
We wanted to stick to as many of the conventions as possible. When watching an opening sequence to a thriller the titles are most commonly shown in a serious, serif styled font with a light blue colouring, having the effect of a chilling and eerie atmosphere. In our opening sequence we chose to use a serif styled front with a striking white colouring, really making it stand out from the moving image. Here is an example:
We kept to the conventions of a thriller by making the costumes dark, casual and also having a blood stained top. Instead of using a knife as the weapon I thought it would be better and in a way more interesting to use a cro bar as I haven't really seen this type of tool used as an actual weapon in other films. The group also brought in that instead of using a car to get away the murderer would be on foot, walking away from the scene. We really used the low key lighting and extreme close ups to hide the identities of the characters whilst still revealing the surroundings by the use of an extreme long shot, still hiding and not realing the character. The music used is an eerie ambient wind to build up a specific atmosphere of tension and uncertainty which is seen in the short clip above. You can also see this in 'Bricks' opening sequence, here is a video showing 'Bricks' opening sequence and then followed by our first shooting:
Tuesday, 24 January 2012
Teacher Assessment: 'Who is the target audience for your media product' post
Here is the feedback in which one of my teachers marked and posted as a comment on the 'Who is the target audience for your media product?':
 From this I was clearly told what I did well about this post and what I could improve. I took on the improvements and changed this post accordingly.

Sunday, 22 January 2012
5. How did you attract/adress your target audience?
We really wanted to successfully engage and attract our target audience of 16-20 year olds as much as we could. So our first step of doing this was to go through and review all of the questionnaires that we gave out and we then made a note of the main things that they would want to see in our opening sequence and what mainly interested them in a thriller/ psychological thriller.

Clearly from looking at the pie chart above you can clearly identify what the target audience is specifically looking for. We took on the idea's of 'Low Key lighting', 'A Non-linear narrative', 'Symbolic, foreshadowing imagery', 'Titles over a moving image' and 'Uneasy, eerie music'.
- Low Key Lighting: We wanted to focus of using this to our fullest potential to really build up and establish a specific mood such as a tense, on edge atmosphere so that the audience was asking questions straight from the start and were hooked and captured

- Non-Linear Narrative and Symbolic, Foreshadowing imagery: My group took this two popular elements and thought of how we could use this in a way that would interest our target audience. So we thought we could build up the whole opening sequence by combining both of them so we had a non-linear narrative that forshadowed the future, which would make our audience keep watching to find out how this came to happen just like the film 'Brick' does.
- Titles Over A Moving Image: We really thought this was a good idea so we went through our storyboard and thought what clips we could use and extend in order to fit in the titles. We didnt want to settel for a plain, black background with a simple title. We wanted to see how we can change the position and angle of them to fit in the clip in a really interesting way for instance along side a van.
- Uneasy, eerie music: The group established that this would be a key element straight from the start as every thriller/ psycological thriller needs this in order to build up a successful atmosphere that would have a good affect on the audience. We tried to incorporate a normal ambient sound such as wind and try to find it with an eerie twist which we managed to do by searching through freesound.org
4. Who would be the audience for you media product?
Here is a Prezi in which tells you who I think our target audience is and why we think this:
Tuesday, 17 January 2012
6. What have you learnt about technologies from the process of constructing this product?
Technology I have used:
Live Type- As a result of using this software I found out interesting ways to create effective titles instead of just using the ones on I Movie HD. This opened up the selection of effects such as Fade in, Baffle, Drop and Bounce and Lurch.
I Movie- As I have never used any I Movie software before I got to learn from scratch how to locate where the clips on the memory card were, import them and also to optimize the clips so they fit the screen better and more efficiently.
Youtube- By adding annotations to a youtube clip it allowed me to present my analysis in an interesting and effective way. It let me to say what I wanted to and position it where I wanted to so the viewer can see it in a clear way. It also allowed the annotations to appear at the point of which I was explaining.

Tripod- I learnt how effective using a Tripod really is. How you can adjust its height to capture something effectively e.g. eyeline match, how you can adjust the angle and also how you can loosen certain knobs to create movements such as a pan and the main thing is that it holds the camera very steady allowing you to capture a clear shot.

By using these wide range of technologies I really feel like I have learnt a range of new technologies and developed my skills with the ones I have already used. I can use in the future to my advantage when I need to, whether it be in my blog work or being included in my actual media product.
Blogger- From using Blogger my mind had been opened to the wide range of software's and ways in which something can be presented by using things such as: Gifs, Youtube annotations, Jing videos, Prezzies, Slideshare, Feedback videos and many more. I have specifically learnt how to embed a video which can be important when explaining something as you can have an example there to accompany it. I used a Jing video which can be found on my blog on how to Embed a Video.
Jing/ Screen-o-matic - By using a Jing video or a screen-o-matic I learnt a new and interesting way of videoing and demonstrating something to someone without actually filming the screen. This lets you film the screen directly with accompanied voice over, then in the end creating a tutorial. The main thing I learnt from this is to firstly use the actual software but to mainly save and then upload the video to my blog whilst changing the size of it to 580x320. Examples of these have been used in this post.
I Movie- As I have never used any I Movie software before I got to learn from scratch how to locate where the clips on the memory card were, import them and also to optimize the clips so they fit the screen better and more efficiently.
I Movie HD- By using I Movie HD I learnt how to import and construct footage and then export it. Also I have learnt how to slow down or speed up a specific clip by using the 'Fast/Slow/Reverse' effect. In addition to this I also found out how to adjust the sound to the right volume.
Prezie, Sliderocket, Dafont, Freesound.org, Bubbl and Slideshare: I have used these technologies in my research, planning and evaluation posts in order to make them supervisual and it allows me to present the text in a interesting manner. Prezi is an interactive presentation, Sliderocket is a slideshow presentation but it appears and lets you include videos on the slide in an imaginative way, Dafont lets you download new and better fonts than the basic ones on microsoft word etc, Bubbl is an online mind-map and Slideshare allows you to upload and publish a presentation in which you made on microsoft powerpoint. All of these technologies have really allowed me to present my posts in an imaginative manner. Each of these technologies were new to me so I had to learn how to use them from the basics and I feel I have becomed more skilled in them already.
Prezie http://prezi.com/ - Here is an example of where I made a prezi for my blog:
Sliderocket http://www.sliderocket.com/: Example of a Sliderocket I have used:
Dafont.com http://www.dafont.com/ -
Freesound.org http://www.freesound.org/ -
Bubbl https://bubbl.us/ -

Slideshare http://www.slideshare.net/ -

Camera- Even though using a camera is quite straight forward, the main thing I learnt
from using one is how to pull focus. I learnt how distance can be important for when trying out this effect we had to play around with how close and far away people were to the camera. Adding to this I really learnt how correct camera shots and movements can really add to an effective shot as well as how continuity is a major aspect when filming

Fig-rig- Using a Fig-Rig enables you to capture something more effectively. For instance when filming my opening sequence with my group we used one of these to follow the actor walking and also mobilise the camera without too much wobble. Making the shots appear more steady and clearer. Here is an example of where we used it in our opening sequence:
Prezie, Sliderocket, Dafont, Freesound.org, Bubbl and Slideshare: I have used these technologies in my research, planning and evaluation posts in order to make them supervisual and it allows me to present the text in a interesting manner. Prezi is an interactive presentation, Sliderocket is a slideshow presentation but it appears and lets you include videos on the slide in an imaginative way, Dafont lets you download new and better fonts than the basic ones on microsoft word etc, Bubbl is an online mind-map and Slideshare allows you to upload and publish a presentation in which you made on microsoft powerpoint. All of these technologies have really allowed me to present my posts in an imaginative manner. Each of these technologies were new to me so I had to learn how to use them from the basics and I feel I have becomed more skilled in them already.
Prezie http://prezi.com/ - Here is an example of where I made a prezi for my blog:
Sliderocket http://www.sliderocket.com/: Example of a Sliderocket I have used:
Dafont.com http://www.dafont.com/ -
Freesound.org http://www.freesound.org/ -
Bubbl https://bubbl.us/ -

Slideshare http://www.slideshare.net/ -

Camera- Even though using a camera is quite straight forward, the main thing I learnt
from using one is how to pull focus. I learnt how distance can be important for when trying out this effect we had to play around with how close and far away people were to the camera. Adding to this I really learnt how correct camera shots and movements can really add to an effective shot as well as how continuity is a major aspect when filming


Tuesday, 10 January 2012
Filming
These photo's below show us filming on the 4th of Janurary at Chatham Close. Here we mainly focused on filming the shots of Jess' character where location and lighting was used effectively to build up and produce effective shots.


These photo's show us filming on 21st December at Anderson Close. On this date we filmed all the shots that needed to be filmed at this location and mainly focused on filming me. The photo's show me applying the fake blood and also me and bronte during filming.


Wednesday, 4 January 2012
Teacher Assessment: Feedback on Planning
 Here is an assessment sheet one of my teachers filled out whilst marking and evaluating my 'Planning' posts. At the moment I'm working at and A as I achieved 17/20. From this I picked out what I need to improve and what is working well. I am very, very pleased with my mark as this gives me reassurance that I'm doing things right.
Subscribe to:
Comments (Atom)